
Pork shoulder (aka pork butt) is one of the best, can’t-miss meats out there. It comes from the shoulder of the pig, despite the “pork butt” terminology. The actual butt of the pig is ham.
It’s perfect. Affordable, perfect ratio of fat/protein, versatile, filling, and tasty. It’s also very difficult to screw up in the cooking process.
Whether you are a veteran or about ready to do your very first smoke, a nice pork shoulder is the way to go. It’s for experts and noobs alike. A regular go-to for anyone into animal-based eating.
Selecting a great pork shoulder
This is the first step. What should you get? Where should you shop?
My very first pork shoulder that I ended up smoking, I got from Aldi. It was a 6.5-pounder and I got it for something like $1.79 per pound. Like I said before, cheap. You can eat for days for $10-11. Ten or eleven bucks for good food, not processed carb-filled crap. How great is that?
The size you should look for is anywhere from five to ten pounds.
Sometimes there will be a larger piece of meat, and that’s fine. You can always cut that in half and cook them on two different days.
Preparation
Pork shoulder is a fatty cut of meat. You’ll notice the fat on the surface and marbled throughout the meat. Don’t cut that fat off! Leave it. It’s flavor. Not only is it flavor, it’s part of what will keep the meat nice and juicy.
If you absolutely can’t stomach eating the fat, you can leave it on the side of your plate as you’re eating it. But don’t trim it before cooking. Try to learn to like the fat. Fat also aids digestion and helps absorb nutrients. Some YouTubers will even tell you to trim some of that fat, but I think that’s a bad idea.
Try to find a piece of meat that you’ll cook within a few days. This prevents you from having to freeze it. A thorough thawing once you freeze it could take 2-3 days. On my first smoking, I took the shoulder out of my freezer and into the refrigerator 48 hours before I put it on the smoker. Once I had it on the smoker, it still had an internal temperature of 27°F.
24 hours before I start to apply heat to the shoulder, I add a thick layer of Kosher salt around the perimeter. Depending on how I cook the shoulder, I take additional steps before applying heat which I’ll describe later on in the article.
Once you apply the Kosher salt, wrap the shoulder thoroughly in aluminum foil and place back in the fridge.
Cooking method No. 1: The smoker
Do you ever fantasize about stopping at a roadside barbeque stand and just getting a big fat order of smoked pork? The bark, the smoke ring, the juiciness? This can be you.
The big rule with smoking is this: Low and slow.
Don’t rush it. Smoking is a day-long process. Before you decide to dive into this, make sure the weather is cooperative, and make sure you have a full day you can commit to being around the pit.
Twelve hours before applying heat, apply a coating of olive oil followed by a dry rub. The salt you added earlier has disappeared into the meat and is working its magic. The olive oil will help keep the dry rub on the meat.
Make sure to set up your meat thermometer the night before, make sure it’s working.
Go time
By now it’s early, early in the morning. Remember, you want to start early and dedicate an entire day to this.
You should use a dedicated smoker for this, but you don’t have to. I use my Char-Griller charcoal grill to smoke.
On the right side of the grill, I use a 12.75 x 9.25 aluminum pan. I pre-light charcoal in a grill chimney, then dump the lit charcoal in the pan. I then dump a large handful of Applewood wood chips in the lit charcoal.
On the left side of the grill, I use another 12.75 x 9.25 aluminum pan and put in water with about a cup of orange or apple juice. Above that I put on my grates and cook the meat on top of that. The shoulder will not be directly over the fire at any point.
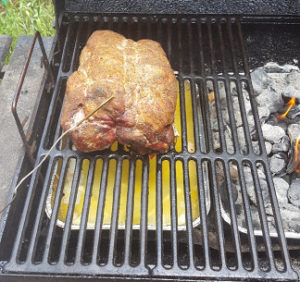
Insert the temperature probe and aim it towards the center of the meat.
Close the cover and any vents.
Your smoker should get up to 300-350 degrees, maybe even a little higher. That’s OK. Let it do its thing. The temperature will gradually lower. You’ll notice the internal temperature of the meat slowly rising.
Let the smoker do its work. Remember it’s a long process. When your smoker temp gets to 220 degrees F, start some more coals in the chimney, then dump them. You’ll have to do this two or three times. Otherwise, leave the smoker closed.
Don’t worry about filling the left pan with more water. The juice from the meat will make up for evaporation.
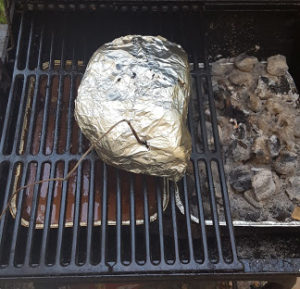
When you reach an internal temperature of 155° F, wrap the pork shoulder in aluminum foil and put back on. While wrapping the pork, keep the smoker closed. Keep the ambient temperature as warm as possible for as long as possible. Put the wrapped pork back on.
Your pork will be ready at 190-195° F. The internal temperature of the pork will stall a few times, usually around 160-165 and then 180-185 degrees.
Pulling the pork off before 190° F internally will result in the pork not pulling apart the way it should. It’ll be safe to eat, sure, but it won’t pull.
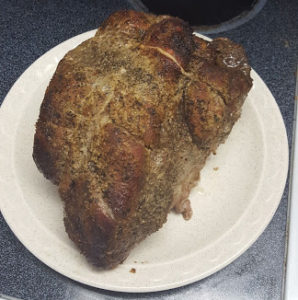
Once you reach that 190-195 degrees, put the pork on a plate and place it in a cooler or an unheated oven for 45 minutes.
After that 45 minutes, you’re done.
What I learned after my first smoke
I did some things right, but other things not so much. Your first attempt will be a learning experience.
• Right: 7 AM start time. From the lighting of my charcoal to the time I pulled my pork from the smoker, it was 11 ½ hours. Including the 45-minute rest at the end, figure 12-13 hours.
• Wrong: I initially got aluminum pans that were too big. If you’re using a grill to smoke, make sure you get pans small enough that they fit side-by-side.
• Right: Temperature retention. Make sure you have hot coals ready once your ambient temperature dips to 200° F.
• Wrong: Water level: I had too much water in my left pan, which prohibited the meat from heating ideally. ½”-¾” of water/juice will do the trick.
• Right: Wood chips make a big difference, and you can smell them while the pork’s smoking. This positively impacts the flavor.
• Wrong: I pulled my last pork off the smoker at 183° degrees, because it had stalled at that temperature for over 30 minutes. Keep it on until 190-195. Remember, give it time.
Cooking method N0. 2: Slow Cooker
Using a slow cooker is a more simple alternative to smoking. The term “slow cooker” is a misnomer by comparison because the pork finishes way sooner than by smoking.
Again, add that thick layer of Kosher salt 24 hours before cooking. Add some more right before putting it in the slow cooker.
Instead of using a dry rub in the slow cooker, I use a liquid marinade. My favorite is mojo marinade. Mojo is a citrus- and garlic-flavored marinade that originated in the Caribbean.
You can buy the mojo marinade in 20-ounce bottles at many grocery stores.
• Put your pork shoulder in the slow cooker.
• Pour in two bottles of the 16-ounce mojo marinade.
• Insert the thermometer probe.
• Put the lid on the cooker, and set the cooker to low.
And that’s it. It should take 6-8 hours to get the pork up to 195 degrees.
When up to 195, the pork should pull apart easily inside of the slow cooker. If it doesn’t, cook it on low for another 30 minutes and try again.
Eat up
Whether you smoke or slow-cook the pork shoulder, it should be juicy and should easily pull apart.
This is also a great option for meal-planning if you want to eat it over the course of a couple of days. It heats up easily in the microwave.
A pound of pork should heat up in a minute-and-a-half to two minutes.
My favorite way to eat the pork is just a pound or so of it in a bowl all by itself, but it’s good for sliders, sandwiches, and even tortillas if you’re feeling like not staying away from bread. I think collard greens are a perfect side dish.
However you eat it, it’s a delicious carb-free option that’s difficult to screw up.
This post may contain affiliate links. See Animalbasedlife.com’s Affiliates Disclosure here.
OMG! I was so happy I came across your article. I have to be the cook this weekend and I am taking your ideas to heart and doing it myself. I love the way you point out specifically the right and wrong way to do this menu as well as the “how to buy” portion as I did not know. Thank you so much for the info and can’t wait to get started!
Hi, Dorrain.
I’m very glad you came across this article and that it gave you some ideas. I hope your cooking turns out well this weekend, and I believe you’ll be in for a real treat.
Thanks for reading and commenting!
Hi,
I found this article fascinating. I love pork and will try this cooking method.
Thanks. It looks yummy.
Lily
Thanks, Lily. They’re both long cooking times, but worth it.